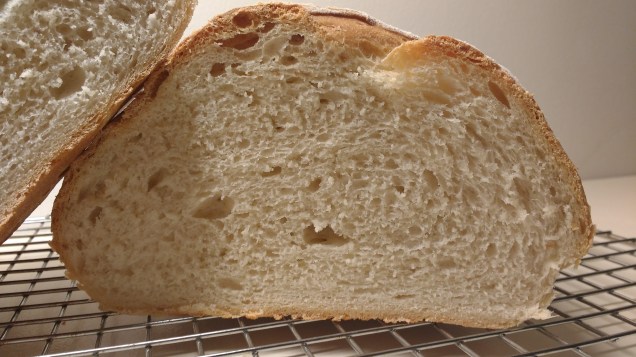
This is a fantastic recipe for classic white bread.
 It has simple ingredients and it follows the basic ‘bread making pattern’.
By that I mean there aren’t complicated or unusual things you have to do to it – just mix-knead-rise, knock back-shape-rise, and bake!
This loaf is a ‘bloomer’. You shape it and then bake it on a baking tray. It doesn’t need a loaf tin. This always put me off making it, as I wasn’t sure how to shape it. But actually, it’s not that difficult!
I think it is as simple as the wholewheat recipe I have, but it just uses white flour only.
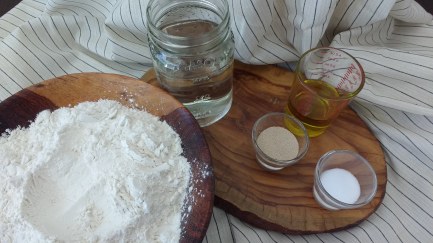
The Ingredients:
- 500g/ 1lb Flour
- 7g/ 2¼ tsp Yeast
- 8g/ 1½ tsp Salt
- 300-320ml/1¼-1½ cups Water, room temperature
- 50ml/3 tbsp Oil
The Method:
1. Mix
- Put the flour in a bowl.
- Add the salt and yeast to opposite sides of the bowl.
- Make a dip in the middle of the flour and drizzle in the oil.
- Start to mix these ingredients.
- By hand: you can mix the ingredients by hand or with a spoon.
- With a mixer: you can use a mixer fitted with a dough hook, on the lowest setting at first.
- Gradually add the water as you mix. You might not need all of it, so keep your eye on the texture. I used 310ml, but other times I’ve used 320ml. When you’ve added enough water the dough should have all the ingredients combined and not be too sticky.
- By hand: add a little water and combine it into the ingredients, then keep adding a little more until the dough comes together.
- With a mixer: as the dough hook is turning on the lowest setting, slowly pour in the water. Stop when you have poured about 90% of the water in and check the consistency. If needed, add the rest.


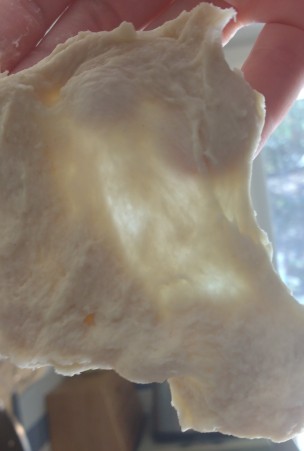
2. Knead
- Knead the dough.
- By hand: Turn the dough out onto the surface and knead for about 10 minutes. Here is a great explanation of how to knead dough. You will know if it is ready when it feels smooth, soft and elastic.
- With a mixer: Turn the mixer to medium and knead for 5-10 minutes, or until it is soft and elastic.
The window pane method is a good way of telling if you have kneaded enough: Stretch out a little piece of dough. If the dough becomes see through without breaking, then it has been kneaded enough.
3. Rise
- Oil a bowl and place the dough in the bowl. The oil stops the dough from sticking to the bowl. Put the bowl in a roomy plastic bag fastened with a clip, or cover it with oiled plastic wrap. Allow to rise for about 2 hours, or until it is noticeably bigger than it was.


4. Knock Back
- Sprinkle some flour over the kitchen surface and turn the dough out. Knead it, or ‘knock back’ for about 5 minutes.
5. Shape
- Press it into a rectangle and fold the long edges into the middle. Turn it over and tuck the short edges underneath. Roll it slightly under your hands so that the seam is on the bottom, but the top is becoming smooth.
 1
1 2
2 3
3
6. Rise
- Line a baking tray, and put the dough on the tray.
- Put the tray into a roomy bag and leave it to rise for another hour.
- In the last 15-20 minutes of the rise, heat the oven to 220°c/430°f. Add an empty loaf tin or skillet into the bottom of the oven.
7. Bake
- When the dough has risen, dust the loaf with flour.
- Slash the top of the bread 3 or 4 times. You need to cut diagonally, about 2cm deep. Add water or ice chips to the loaf tin to create some steam, this will help the crust. Put the bread in and bake for 25 minutes. Then turn the oven down to 200°c/390°f for 10-15 minutes.
- After you take the bread out, turn it over and tap the bread on the bottom. If it sounds hollow, it is baked.
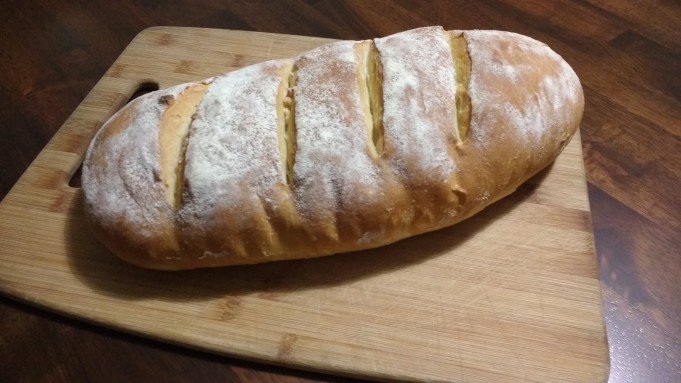
Have a go and let me know how your bloomer turns out!
Need some more bread making tips? See my post here.
You might also like:
- A Little Extra Goodness: Oats and Bread
- 8 Top Tips for Sourdough Success
- How to Make Beetroot Bread
- 5 Great Baguette Making Tips
- How to Make Basic Bread Rolls
- 4 Easy Ways to Create the Perfect Crust

Loved it
LikeLiked by 1 person
Thanks!
LikeLiked by 1 person
Pingback: A Beginner Baker’s Bread Making Toolkit | It can't hurt to try…